Kamis, 27 Februari 2014

Fuji X-T1, A Contrarian Ergonomic View


Appearances can be deceptive. This is the strangest and ugliest ship I have ever seen but apparently it performs its designated tasks very well. The Fuji X-T1 scores highly on appearance but may not be so wonderful in action.
 
If the Fuji X-T1 is the answer, what was the question ?

X-T1, the latest darling of camera reviewers   Since it's announcement at the end of January 2014, camera reviewers have been fulsome in their praise for Fuji's latest interpretation of the traditional/modern hybrid mirrorless interchangeable lens camera. Several early reviews including those from Tech Radar, Pocket Lint, E Photozine and Photography Blog,  gave it 5/5 stars,  a level of support you don't often see. Several of the reviewers wrote that they were very excited to be testing this camera. The X-T1 has generated a level of emotional response not usually seen in journalists whose daily grind is to review stuff.
The Sceptic     I am a sceptic by nature and a grumpy old man as well.  My good humour has not been improved recently by recurrent  problems with osteoarthritis. I can and do  manage to find some kind of fault or imperfection with every camera which passes through my hands.  I am, by the way, completely independent and ecumenical in my criticisms. No make or brand is favoured and none escapes unscathed by critique.  Nobody  gives me product to test.
Notwithstanding  my  disposition to grumpiness, I think there are  real issues with the X-T1's ergonomics which deserve some discussion.
The Camera Ergonomics Blog   I started and continue this blog with the purpose of raising consumer awareness about ergonomic issues in the design of cameras. I was moved to do this by my perception that some cameras featured ergonomic realisation so atrocious it defied belief. 
I don't think the X-T1 has atrocious ergonomics, but it is not the cynosure which some reviewers appear to believe.
What's the problem ?  I identify two specific ergonomic issues about the X-T1 which I believe deserve thoughtful consideration.   They both derive from Fuji's attempt to blend traditional and modern user interface features in one device.
1. Shutter button position on top of the camera body, and the ergonomic consequences which flow from this placement.
2. Use of  "set-and-see" dials for  primary and secondary exposure parameters, and the ergonomic and functional consequences which flow from this.
A little background   To illustrate  the concept of a "traditional" user interface I  use the Pentax Spotmatic of 1970 as an example. This is a classic manual control film SLR.  I used one for several years in the 1970's and recently bought another one on E Bay to reacquaint myself with it's delights and  frustrations, of which there are several. Many SLR's of the era had a very similar appearance and control system.
To illustrate the "modern" user interface I have used the Canon EOS 300, one of the earliest cameras with a Mode Dial.
Pentax Spotmatic.  In the 40 years since I used one of these regularly, I had forgotten just how darn awkward and uncomfortable it is to use. With lens it weighs 830 grams so it's no lightweight. I have trouble getting a secure grip on the thing. The strap lug keeps digging into my third finger which keeps accidentally activating the clockwork self timer. Stop down aperture manual exposure metering takes several seconds even with practice. This camera is my nostalgic favourite but I am glad I don't have to use it any more.
 

The Pentax Spotmatic photo     You can see me holding the Spotmatic in the photo. This is a minimalist control system. You can see all the control modules in the photo. Manual focus is by turning the front ring on the lens. Aperture is set with the rear ring on the lens. You can estimate depth of focus directly on the lens. Shutter speed is adjusted via the set-and-see dial on top of the body.  Film speed is set by lifting and rotating the same dial. This can also function as a simple form of exposure compensation setting.   There were no zoom lenses for consumer cameras in those days. This camera has the two features which I want to discuss in this post, namely shutter button on top of the body and primary exposure parameters on set-and-see dials.
Canon EOS 300
 

The Canon EOS 300 photo   Canon's SLR's had been sprouting handles of various kinds for several years through the 1970's and 80's. But the T90 of 1984 took the next step. It enlarged and raised the handle, put the shutter button on top of the handle, (not the camera body)   and added a control dial behind the shutter button.  Around year 2000, the Mode Dial appeared.  The EOS 300 in the photo shows the projecting handle, shutter button top front on the handle, control dial behind the shutter button, a raised thumb support and a Mode Dial. These are the main features of  the "modern" control system found in most DSLR's today.   Primary exposure parameters are adjusted with a combination of Mode Dial setting  and control dial movement.  There is zoom but no aperture adjustment on the lens.

The digital era  The Spotmatic and EOS 300 are of course film cameras. Now digital cameras are festooned with a multitude of features, modes and control modules the like of which could not have been imagined in the film era. But these have been added on top of the underlying core functional control layout. Many  modern cameras use the "modern" system but some including the X-T1 use the "traditional" system.
Photo Courtesy of Digital Photography Review  dpreview.com
Fuji X-T1 top view showing ISO, shutter speed and Exposure compensation dials. You can see the small handle.
 

Consequences of locating the shutter button on top   Several modern electronic cameras have chosen for reasons known only to their designers to locate the shutter button on top of the body. For example the Sony Alpha 7/7R, Canon G16, Nikon P7800, Fuji X-Pro and X-E1/2 and of course the Fuji X-T1.
If you look at the Pentax Spotmatic photo you can see how the fingers of my right hand have to arrange themselves in order to hold this camera.  The right hand has to rotate back so the index finger can get onto the shutter button.  This has consequences:
* A full anatomical handle cannot be fitted or if it were to be fitted would require uncomfortable separation of the right index and third fingers. The Alpha 7/7R does  this.
* There is no clear place where a front control dial might be located.   The A7/7R, G16, P7800 and X-T1 each does have a front control dial fitted and in each case accessibility of the dial is compromised. It is tucked down in front of the top section of the body and obstructed  by  the right third finger when holding the camera ready to shoot. With each of these cameras you have to shift grip with the right hand to get the right index finger onto the dial.  That is suboptimal ergonomics. The only cameras which I have encountered which manage this situation reasonably well are the Olympus Pens and Panasonic GX7.  These use a horizontally mounted control dial located like a collar around the shutter button. That works because you can rotate the dial without having to shift the third finger.
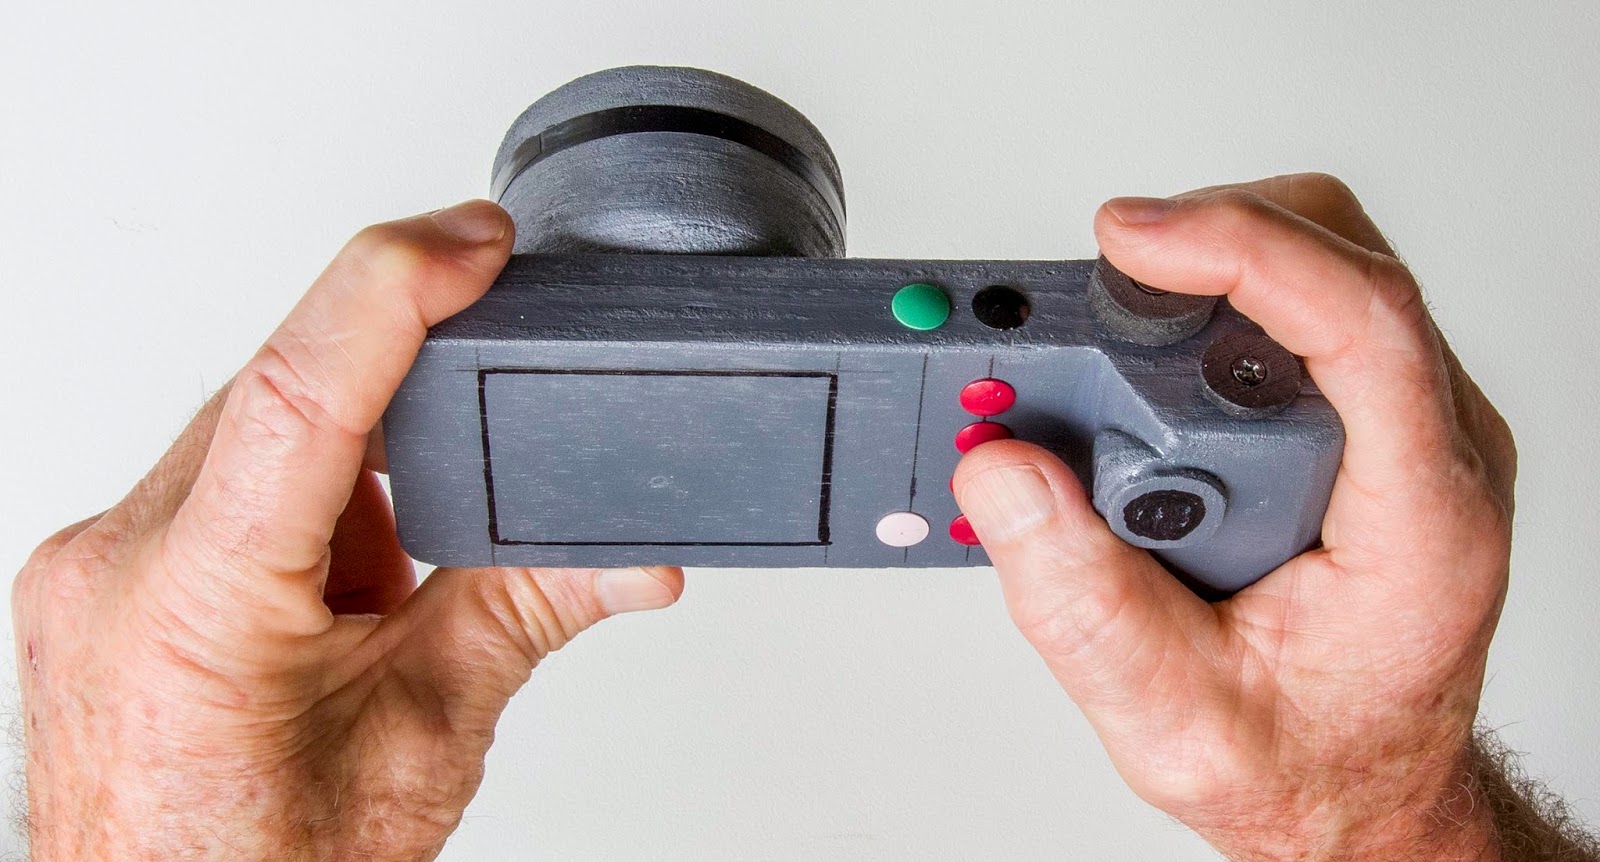
* There is no opportunity to build a right middle finger hookup notch into the handle configuration. The photo of the orange mockup illustrates a design which does provide such a hookup.   The handle shape is designed with a pronounced notch below the shutter button. This has two benefits.  It permits optimum positioning of the shutter button so the right index finger falls on it naturally. And it allows the third finger of the right hand to support the weight of the camera with muscles relaxed, without having to squeeze the body to gain purchase on it.  Who cares ?  In order to operate the X-T1, the user has to remove the left hand completely from support duties beneath the lens in order to access and turn the ISO dial.
Photo courtesy of Digital photography Review dpreview.com
You can see the position of the right hand and fingers required to hold this camera is very similar to that shown in the Pentax Spotmatic photo above and quite different from that shown in the EOS300 photo, the mockup photo or the GH3 photo.
 
 
This mockup represents my realisation of an ergonomically well designed small camera. The right hand adopts a relaxed half closed posture with wide separation between the thumb and index finger but small separation between the index finger and third finger. The third finger fits comfortably in the notch beneath the shutter button to easily support the weight without strain. The front dial located just behind the shutter button is easily reached by the index finger without having to move a muscle of any other finger. 
 
 
Consequences of  allocating primary and secondary exposure parameters to set-and-see dials on the camera top    The X-T1 places set-and-see dials for ISO, shutter speed and exposure +/- on the top plate.  Aperture is adjusted via a ring around the lens barrel. On single focal length lenses the set aperture is displayed on the lens barrel. But with variable aperture zooms the aperture cannot be thus displayed so it goes to the EVF/monitor camera data display instead.     Some reviewers have opined these direct displays to be a wonderful idea because you can see your camera's primary (aperture, shutter speed and ISO) and secondary (exposure compensation) exposure parameters without having to put the camera to the eye.  However in practice, there are several problems with this. I mention just three:
1. You cannot see any set-and-see dials of any kind when you are actually taking photos, with your eye to the viewfinder, in the Capture Phase of use. This is when you most need to see this camera data.    The camera makers helpfully provide you with the same data as a readout in the EVF or monitor.  But if you have the data in the EVF or monitor you don't need the same data on set-and-see dials on top of the camera.  If modern cameras were really simple things like my old Pentax Spotmatic this would not be a problem. But modern electronic cameras have modes.  Focus mode, autofocus mode, drive mode, flash mode, exposure mode, stabiliser mode, etcetera.....etcetera...... the list goes on and on.  It really streamlines camera operation in Prepare Phase (the minutes just before capture) if the most used modes can be brought out of their hiding place in a menu and allocated to set-and see dials. This is the best use which can be made of set-and-see dials.
The opportunity cost of using set-and-see dials for primary exposure parameters is that those same dials cannot be used for more beneficial purposes, especially modes which require setting in Prepare Phase.
2. It is possible, in fact quite easy if you have a systematic approach, to identify and name each of the actions required to operate a modern camera. Furthermore, it is easy enough to conduct a time and motion study of each of these actions.  This study identifies how many movements of the hands and fingers are required for each action and notes the complexity of each movement,  together with observation about any other movements required to make the index movement possible.  For instance you can study [switch from aperture priority AE to shutter priority AE]  or [change shutter speed when in shutter priority AE]  or [change from single AF, single shot drive to continuous AF, continuous drive, 4 fps].  You get the idea.  On a modern camera there could be dozens of  such actions which might be worth studying as the potential number of permutations of the various modes and operational settings runs into the millions.  Every time I run tests  like this comparing cameras with  modern, Mode Dial + Control dial(s) operating system with cameras having traditional, primary exposure parameters on set-and-see dials, I find the modern method uses fewer movements of less complexity to carry out almost all the actions required to operate the camera.
3. There being no mode dial there is no 'Fully Auto" mode for novices. In fact the whole layout looks as though it would frighten off most novices. Fuji may say they are just looking to fill a niche populated by expert/enthusiast users. But in a market environment of steeply falling sales across all categories I think it highly likely that manufacturers need to capture buyers of all expertise levels.
Panasonic GH3
 
Photo Panasonic GH3  This is an unambiguously modern electronic camera which makes no attempt to appeal to the glory days of traditional photography.  Some bloggers and reviewers have criticised it for lacking "soul" or "character" and there was silly me thinking it was just an inanimate device.  This is my all day every day camera which most decidedly does not work like a Pentax Spotmatic and is thankfully not cluttered with redundant user interface modules to slow down it's operation. It has a proper ergonomic handle and uses set-and-see interface modules efficiently.

Summary  Harking backward is not the way forward.  The hybrid traditional user interface might have nostalgic appeal and "character" (whatever that may be) but it is less efficient than a well designed, fully realised modern interface.

What about the answer to my original question: If the X-T1 is the answer what was the question ?  I really have no idea and have no knowlege of the decision making process which goes on in any camera making enterprise. So I must guess and my guess would be something like: "If you can't beat them and can't join them, do something different."  That more or less describes what Fuji is doing and I wish them well. But I think they are on the wrong track.
In due course the market will deliver it's verdict.


Does the Advanced Compact have a future ?


This photo was made possible by Photoshop Camera Raw. The original image could have come from any one of many cameras. It was in fact a M43 camera with wide angle lens.
 
Is "Large Compact" an oxymoron ?
The Best or Worst of both worlds ?

Background  The advanced compact camera has a history. The genre was popularised by Canon's G series dating from around 2000.  The 3 Mpx G1 weighed a substantial 490 grams and measured 120x77x66mm in size. It was compact when compared with a DSLR. 
Currently there are several cameras which could be described  as  "Large/advanced/enthusiast compact".
These include the Canon G16, Nikon P7800 and  Fuji X20. Smaller versions of the theme might include the Panasonic LX7 and Olympus XZ 10. The Canon G1X is larger but still marketed as a compact.
The march of technology- the little ones  Within the shrinking world of compact cameras the Sony RX100 of 2012 redefined our expectations of the genre, fitting a large, high performing sensor into a genuinely small and for many users, pocketable, housing.  This camera made all other small compacts look distinctly second rate.  I suspect only it's high price saved the opposition from a market wipeout.
The march of technology- the larger ones   Over the last five years or so, interchangeable lens cameras and their lenses have shrunken remarkably. There are now several mirrorless interchangeable lens cameras (MILC)  which are almost as small as the RX100 and are smaller than most of the large/advanced compacts.
Where do these developments leave the advanced compact ?   Squeezed from above and below, I would say.  I imagine the manufacturers are trying to find a size/features/capability formula which will give the user the best features of the little ones and the larger ones.  But my recent experience has me thinking the advanced compact has become unconvincing as a compact (too large) or as an all purpose camera (lack of features, capability and performance).
In the center, Nikon P7800. On the left is my mockup of an "ideal" small compact just 2mm larger than the RX100(II). On the right my mockup of the direction in which I believe the advanced compact could go. This is the same width and height as the P7800. Depth would depend on the lens fitted. It fits in a small camera bag yet has much better handling qualities and would be more enjoyable to use than the P7800. It feels like a proper camera in the hand, whereas the P7800 never feels quite right to me no matter which way I hold it. 
 
My experienceWhen my main camera was a DSLR with 3-4 lenses,  it seemed natural to have an advanced compact for those quite frequent times when I did not want to lug the heavy kit around.  I owned several Canon G cams the inclusion of which in my camera drawer made perfect sense to me.
I recently bought, used and have reviewed on this blog a Canon G16 and a Nikon P7800.  Both have been disappointing. Not because there is anything terminally awful about either but because the genre no longer makes sense to me as it once did.
The RX100 is smaller than the G16 but has a better sensor and picture quality at high ISO settings. My Panasonic G6 with kit zoom lens is only slightly larger than the Nikon P7800 but provides better picture quality, performance and ergonomics. The Panasonic GM1 is incredibly small at the cost of loss of the EVF, handle and ergonomic capabilities.
The bag or pocket decision  If the requirement is for a "pocketable" camera then the package must be very small. Small enough to actually fit in a pocket or lady's purse, for instance.   Some users might deem their advanced compact "pocketable" and for those with very large pockets that might be feasible. I live in Sydney where it is usually fine and sunny so hardly anybody needs to wear a coat or jacket even in the slightly cooler time we call winter.  So many people lack any kind of garment with a pocket large enough to accept an advanced compact.  Therefore it is carried in a camera pouch or small bag slung over the shoulder. 
Now here is the thing.  Once one has decided the camera needs to travel  in a bag of some kind, there is very little impediment to getting a slightly larger bag and  filling  it with a larger and more capable camera.
Is there a way forward ?  It seems to me the advanced compacts are increasingly looking like half baked products, unconvincing in any role. Witness the Canon G1X for example. My family acquired one of these soon after it was released. Canon touted it as a high end product for the discriminating user. It was very disappointing.  Performance was slow in every respect, the optical viewfinder was the same small inaccurate one found in generations of previous G cams, highlight clipping was common and the ergonomics were just barely acceptable. For all this the camera was neither small nor light.  Now the updated model the G1X (II) has lost the viewfinder altogether, lost the articulated monitor and has reduced the size of the handle and control panel on the right side of the body. They want you to pay extra for an EVF and an accessory handle. You could buy a DSLR or MILC with lens for that money and find it only slightly larger in the camera bag. Yes the G1X (II) appears to have a nice lens but that alone does not make a camera desirable.
I would like to see the advanced compacts go one way or the other. Either down in size to match or even improve on the RX100.  Or up in size to gain a full suite of features,  capabilities and ergonomics.  If Canon put the lens (assuming it is a really good one) from the G1X (II) into a fully featured body with proper handle, EVF, good ergonomics and performance, they might end up with a really desirable camera which the enthusiast would enjoy using.
Olympus appears to have gone in this direction with it's Stylus 1 model.  This has a 10.7x, constant f2.8 zoom, nice EVF, and good performance. It could benefit from a more prominent handle but otherwise has a set of specifications and features suitable for an expert/enthusiast, all purpose camera.


Senin, 17 Februari 2014

Nikon P7800 Large/Advanced Compact User Report


Casual snap, hand held, made on a morning walk
 
I bought a P7800  to discover whether it would serve as a substitute for my Micro Four Thirds kit at those times when I did not care to have a MILC and three or four lenses with me.
P7800 Rear
What is it ?    The P7800 is the descendant of a line of  cameras starting with the P5000 of 2007, followed by the P7000, P7100, P7700 and now P7800.  Various items, such as a viewfinder, have been deleted then returned. Over time the line has grown in size, acquired a faster lens, EVF, articulated monitor and more control modules (buttons, dials, switches etc.).
P7800 Front


Feature set  On paper the P7800 has a more appealing feature set than most of  it's competitors in the compact-in-name-but-not-in-size category. In particular it has most of the features which together make up what I call the Proper Camera.     These are
For Holding:  A substantial, anatomical handle of good ergonomic design and a well designed thumb support.  The P7800 has a handle but it is small and not optimally shaped.
For Viewing: A  built in EVF and a fully articulated monitor. The P7800 has an EVF but unfortunately it is not a top quality unit.  The monitor is very nice.
For Operating:  A full set of controls to enable primary and secondary exposure and focussing parameters to be adjusted with the eye to the viewfinder and without having to change grip with either hand.   The P7800 does allow the user to achieve most of this.
 

Picture Quality 
The lens  is one of the P7800's best features. I tested it against my 12-35mm f2.8 and 35-100mm f2.8 micro four thirds lenses in a GH3 body. The pro grade M43 lenses out resolved the P7800 by a very small margin which was only evident on a test chart. The P7800 lens delivered excellent clarity and sharpness across almost the whole range of focal lengths and apertures. Vibration Reduction appears to work very well, allowing sharp photos down to 1/30 second at the long end of the lens, hand held.  A standard, screw in 40.5 mm protective filter can be fitted to the front of the lens. The lens is not self capping, a separate lens cap is provided.
The only weak spots I found were:
* Softness in the corners at the wide end with the aperture wide open. Stopping down from f2 to f4 cleans up the problem, should it be necessary to represent fine detail in the corners.
* A tendency to local flare in bright highlights which can lead to loss of detail in bright picture elements. I found this evident with direct sun falling on white fiberglass boats at a marina.
Noise  There is a bit of noise in shadows even at base ISO setting and of course noise becomes more evident at high ISO settings. But overall it is well controlled giving the appearance of fine grain film in the ISO 400-800 range.  Due to the wide aperture of the lens it is not often necessary to use higher ISO settings in general indoor or outdoor photography.
 

Color and tonal gradation   Both RAW and JPG files deliver pleasing color and tonal gradation even at ISO 1600.  I did notice there is no option for Adobe RGB, only sRGB. Despite this the pictures looked good to me.
RAW vs JPG   JPG's  look good straight out of the camera however the .NRW  RAW files provide opportunity to recover more highlight and shadow detail.  The .NRW files are surprisingly large, averaging around 25.75 Mb.  This may be a factor in the camera's slow shot to shot performance.
Overall   picture quality is  pleasing.  There is a mild tendency for highlights to blow out, possibly related to the lens flare problem referred to above and possibly to the small (9.3mm diagonal) sensor used by this camera. But for the most part I found very little about which to complain.
Performance  
This is the P7800's most obvious shortcoming. Previous models in the series were criticised by reviewers for their slow operation. Unfortunately this has not improved much in the current model.  The main problem is shot to shot times. Using RAW capture, SanDisk 95 Mb/sec card, AF and AE on each shot, single AF single shot,  I was able to make one exposure every 3.4 seconds.  With RAW+JPG capture the rate was one shot every 3.5 seconds.
Autofocus acquisition is decently prompt although not in the same league as the latest Micro Four Thirds cameras.  AF accuracy is good with very few incorrectly focussed frames. If the camera cannot focus, which is fairly frequently the case in low light, it will put up the flashing red focus brackets, prompting the user to find a brighter or more contrasty subject element on which to focus.
Position of the active AF area can be moved quickly and easily although I did not find any means to recenter the AF area in one action. AF area size is not adjustable.
Ergonomics
Holding    The good news is that the P7800 has a handle, a thumb support, front and rear dials. The not so good news is that the relationship between my right hand and fingers, the shutter button, the front dial and the handle never feels quite right no matter which way I hold the camera. The photos illustrate this.
This is the most comfortable holding/operating position for me. But the front control dial is covered by my middle finger and inaccessible.
In this position the front control dial is now accessible for operation by the index finger. But I find that gap between the index and third fingers an uncomfortable stretch. Younger and more flexible people might not be troubled by this but even so,  the position is not an anatomically natural one.  In use, I find myself forever switching back and forth from one grip position to the other if I want to use the front dial.  

Viewing    The good news is that the P7800 has both a built in EVF and a fully articulated monitor. Thank you Nikon. The monitor is of very good quality and is large. Actually it might be a bit too large for the rest of the camera, pushing the thumb support and user interface modules into a small space on the right side.
The not so good  news is that the EVF is adequate as a framing device but does not provide a particularly enjoyable viewing experience.  It presents a slightly washed out, desaturated  appearance, with a tendency to lose highlight detail.
Unfortunately the EVF is not adjustable in any way. (The eyepiece diopter is adjustable). The monitor is adjustable for brightness but I found it just fine at default level.
The monitor and EVF have the same presentation style, with camera data superimposed over the image preview.  Shutter speed and aperture  are displayed in a black rectangle near the bottom of the frame. The good thing about this is you can see the status of those  essential parameters with any kind of subject being previewed. The bad news is you can't see the section of the subject overlaid by the data display.         Icons for other data types are distributed around the frame. All these except the shutter speed,  aperture, AF rectangle and composition grid  disappear with a half press of the shutter button,  thank you Nikon.
This is probably the best implementation of a monitor style (superimposed) type of display which I have seen. However I still prefer the viewfinder style display, with camera data allocated to a strip beneath the image preview on both monitor and EVF.  With some cameras you get to choose. Not this one.
Some reviewers have complained about the absence of a proximity sensor for automatic monitor/EVF switching. In use I did not find this to be a problem at all. If the monitor is turned in, view will automatically switch to the EVF. If the monitor is turned out it automatically switches on. This is in harmony with the way I use a camera with fully articulated monitor and EVF so I found this arrangement quite satisfactory.
Operating    
Setup Phase  Menus are well designed and displayed, easy to navigate and comprehend. There are enough choices to keep enthusiasts happy without overwhelming novices.  A  My Menu   page with user selectable content and menu resume is available via the Q Menu button.  This is well implemented.
Prepare Phase  The camera is well configured to select main shooting mode, drive mode, focus mode and autofocus mode.  The Q Menu gives ready access to several shooting parameters. The Fn1 button can be three way, user selectable,  multi tasked  by pressing the button then rotating one or other dial, or pressing the shutter button. This is a clever way to finesse multiple functions from one button.   On screen/EVF  prompts remind the user which action will occur.  With practice all the actions usually required in this phase are readily accomplished.
Capture Phase  Aperture and shutter speed are easily adjusted with the eye to the viewfinder. ISO requires a trip to the Q Menu. With some practice this can be achieved while looking through the viewfinder but I suspect most users will lower the camera so they can see the button. Implementation of ISO adjust is good with easy switching from auto ISO to a specific setting.  A minimum shutter speed can be set for auto ISO but the camera will over ride this if light levels are too low. Unfortunately the actual ISO setting chosen by the camera is not displayed in auto ISO. 
Exposure compensation is directly accessed on a top dial. Warning of any compensation is displayed in the EVF or monitor which also gain up or down to provide a live preview of the effect.
You can initiate back button AF with the AE-L/AF-L button,  similar to a DSLR or high end MILC.
Position of the active AF area is easily changed using the OK button and 4 way keys.
AF/MF switch is readily made and MF is useful, with an analogue distance display. There is also an option to combine AF + MF. This is a bit fiddly involving several button presses but one is not usually in a hurry when using MF.
Review Phase  All the usual review functions operate efficiently, with no problems. One minor quibble: I could not find any way to jump from one image zoomed in to the next one at the same zoom level.
Overall  The practiced user is able to operate the camera efficiently in all phases of use.
Summary  The Nikon P7800 is a well specified, well featured small camera with a good lens, versatile zoom range and good picture quality, let down by slow performance, a disappointing EVF  and some unnecessary ergonomic limitations.
The camera is suitable for a leisurely style of photography such as scenes and groups of people in reasonably static settings. It would be suitable for portrait work with a cooperative  subject.
But for children at play or other situations requiring rapid response to subjects moving I think the P7800 might prove frustrating.
It may or may not find a long term place in my camera drawer, I will keep and use it for a time then decide.  


Rabu, 12 Februari 2014

Sigma dp2 Quattro Ergonomic Study


Finger on shutter button. Least uncomfortable basic hold position
 
Using a mockup

Fake, joke or real ?  When rumors and first pictures of this highly unusual looking camera started to appear on the web, some  commentators opined that they thought it was a joke or fake. Others said they hoped it was a fake because it looked so strange and how was anyone with human hands and fingers supposed to hold the thing anyway ?
It's real   Soon enough, the dp2Q was revealed at the CP+ show to be indeed real.  There were plenty of photographs of the device from all angles but no pictures of any one actually holding it.
A "Hands On" published by DPReview (dpreview.com) on 13 February 2014 was actually a "Hands beneath", as if the thing were too hot to hold.  
My enquiring mind  I want to know how stuff works, or indeed if it works at all. So I was intrigued by the dp2Q the shape which was nothing like any thing I had seen in 60 years of using cameras.
The mockup  The basic method which I use to investigate camera ergonomics is to make mockups. So, using the published specifications and photographs, I made one of the dp2Q.  It is built up from some plywood offcuts I had sitting about in the garage. The finish is a bit rough but the dimensions and button/dial locations are correct if the published dimensional specifications are correct.  
The purpose of this was to discover how one might hold and operate such an unlikely looking device. 
Analysis  My investigations and comment are entirely about holding and, to the extent permitted by a non functioning mockup, operating the device as a hand held camera.
There is much discussion in forums about technical aspects of the sensor, lens, etc. I have nothing useful to contribute to this line of discourse.
Questions  I can't help wondering however why the thing is so wide. There must surely be some compelling reason because the extreme width makes the shape difficult  to fit in most camera bags/pouches intended for a single camera. Maybe the  width enhances heat dissipation, or reduces electronic cross talk or something like that.
I also wondered why the lens module has such a large diameter when the glass inside it is so much smaller. Presumably answers to these questions will be forthcoming in due course.
Then I wondered why the handle has been given such an unusual shape and configuration. I wanted to know if it would represent an ergonomic triumph, abject failure or just an eccentric mediocrity.
Hands on  At first I had no idea how the designers intended the hands and fingers should be positioned so as to best hold and operate the camera. So there was quite a bit of experimentation until I settled on the positions you see in the photographs.
Comments on holding  I was unable to find any comfortable, secure hold position with the right hand. The photographs show what I found to be the least uncomfortable hand/finger positions. The left hand was an easier proposition with the thumb and index finger falling naturally onto the top and bottom plates of the body.
In general the right hand grip was weak, bordering on precarious, with no proper forward projecting handle on which the fingers might gain purchase. Use of the rear dial and AF button in particular, require the camera to be held securely by the left hand.
In use the camera would be a two handed proposition with little opportunity for safe one handed use.

Photos 
The header photo shows my average adult male hands holding the camera in the least uncomfortable position which I could find. It's not a particularly enjoyable experience. The third and fourth fingers of the right hand have to wrap around a sharpish corner on the front of the handle. No part of the handle fits the shape of my hand. I have my thumb tucked under the funny little protrusion topped by a button labelled "focus". This provides a reasonably secure hold and enables the right index finger to operate the shutter button and the dial around the shutter button.  Note however that my thumb is almost touching one of the red buttons (of course they are not red in the real camera) which appear to be at high risk of accidental activation.

Now my thumb has moved up to press the "Focus" button. I don't know if this activates AF or a Focus/Autofocus Mode. This is a bit precarious. There is now nothing into which any of the fingers of the right hand can hook to prevent the camera from falling. Some purchase is gained by squeezing the third and fourth fingers of the right hand, thereby pressing the handle into the palm. But the main camera support has to come from the left hand.
The pad around the focus button is a 4 way cursor/controller.  When operating this I need to remove my finger from the shutter button which leaves no part of the right hand actually holding the camera. It is possible to hook the little finger of the right hand under the handle at this time to give some support to the right side of the unit.


Now the thumb is raised further to engage with the rear dial. You can also see that my index finger is obstructing the thumb from rotating the dial to the right. Most times when I tried this it was easier to lift the index finger off the shutter button to give the thumb free movement.  This leaves nothing much holding the camera in the right hand. There is a bit of purchase gained by squeezing the third and fourth fingers in towards the palm.
 
 
To the left, as viewed by the user, of the shutter button is a button labelled "Mode". Presumably one changes Shooting Mode by pressing this button then rotating a dial, with or without holding down the Mode button. Either way, this operation is very awkward, requiring the right hand to completely release it's (somewhat tenuous) hold on the handle in order to reach over to the Mode button. In the meantime my thumb appears to be  accidentally hitting one of those red buttons again.
If I want to press a red button I will again have to completely release the right hand or maintain grip with the right hand and use the left hand to reach the red buttons.
 
Conclusion  So, is the dp2Q an ergonomic triumph, abject failure or eccentric mediocrity ?

I suppose one could say it is a triumph of sorts:  of  modernist angular design over human functional anatomy. Or  some designer's vision over ergonomic reality. But that is probably not the kind of triumph the designers were hoping for.
It's not a complete disaster either, in the sense that a practiced user should be able to operate the device without too many major dramas. And it will only fall to the ground if one forgets to hold on with the left hand or fails to keep some kind of neck strap in place all the time.
So, it's an eccentric mediocrity. The handle in particular feels like something which is different for the sake of difference.
Shame really, they could easily have done it so much better.

Senin, 10 Februari 2014

Panasonic Pancake Primes


14mm on the left, 20mm on the right
 
14mm f2.5 (H-H014)  and 20mm f1.7 (H-H020AK)

Single focal length lenses in the age of zooms   For many years in the second half of the 20th Century I used nothing but fixed focal length lenses. There was no such thing as a consumer grade zoom. These days the quality of zooms is such that I use them almost exclusively.
Why use fixed focal length lenses ?  It seems to me that these need to bring something desirable to the user experience.  It might be smaller size, wider maximum aperture, better optical performance, some special feature not available in a zoom or lower price.
Why pancakes ?  Clearly these are designed to be as small as possible thereby making for a very compact kit. There is ongoing  marketing and consumer interest in the possibility of the M43 system delivering high image quality in a very small package. Witness the recent arrival of the Lumix GM1, for instance.
Both the 20mm f1.7 and the 14mm f2.5 have been available since the early days of the M43 system.
I had the opportunity to purchase both lenses at an attractive price. I bought the Mk2 version of the 20mm. This is said by Panasonic to have the same optical construction as the original but with improved coatings for decreased flare and better contrast.
20mm
 
Initial impressions  Both lenses are very small, the 14mm remarkably so. They take up very little space in a camera bag and add  little to the effective dimensions of any camera body onto which they may be mounted.
Physical  The two lenses share styling cues. Both have a smooth turning manual focus ring which actuates a focussing motor. The 20mm focusses by moving the entire inner barrel including filter, back and forth. I was unable to determine whether the rear element is fixed or whether it moves with focussing. These lenses park themselves at infinity focus when powered down and there is no way to operate  manual focus with the lens off camera.
The 14mm focusses internally, there being no movement of the front element or filter with focus.
As a consequence the 14mm focusses very fast,  providing AF speed equal to the 12-35mm zoom.  The 20mm is noticeably slower to focus. In use with general photography this is not an issue.  However if you wanted to photograph, say, small children playing, the 20mm might not quite keep up.
There are no other controls on the lenses. Neither has OIS.  Each uses a 46mm screw on filter.
20mm

Optical   I tested both lenses alongside the Lumix 12-35mm f2.8 zoom for comparison. I photographed a test chart and also made many general photographic pictures.
14mm f2.5  This lens was not quite up to the standard of the 12-35mm at 14mm. It was not as sharp at the edges or corners, exhibited noticeable barrel distortion, obvious corner shading and chromatic aberration.  Stopping down improved edge/corner performance a bit but it never cleaned up completely. There was slight decentering on my copy, evident as slightly greater softness on one side than the other. Resistance to flare was quite good.
20mm f1.7  This lens turned in a better optical performance. Even at f1.7 sharpness was very good with mild softness evident in the corners. By f4 the lens was very sharp right into the corners. There was mild barrel distortion and clearly evident corner shading at f1.7.  Flare resistance was good.  I rated this lens as equal to the 12-35mm (at 20mm ) at f2.8 and smaller apertures. The advantage of the 20mm is that it is 1.5 stops faster  wide open and the lens is entirely usable at f1.7.
14mm

Usefulness  Many photographers find that a  diagonal angle of view of about 55-65 degrees suits their requirements for general walk around photography. With a DAV of 57 degrees the 20mm is more or less in the middle of that range. If I had to use just one single focal length lens for every shot, I would select the 20mm.
The 14mm focal length is a bit more problematic. As  a wide angle complement to the 20mm I would prefer a 12mm. The problem for the 14mm f2.5 is that it is not really wide enough for some  purposes and the aperture is not much greater than most kit zooms at 14mm.
14mm

Summary  The 20mm f1.7 is one of the most popular single focal length Panasonic lenses and deservedly so. It has a convincingly wide maximum aperture, good optical performance from wide open and  a  useful focal length. One downside of this lens is that banding in pictures can occur with high ISO settings on some cameras. Unfortunately the banding problem persists with the Mk2 version. I have no idea why banding might occur but the problem has been reported often on user forums.
The 14mm is less popular,  also deservedly so. It's optical performance is no better than the wide end of a kit zoom and it's maximum aperture is not greatly larger than one of those zooms. It is also in many situations not really wide enough to complement the 20mm as part of a compact 2 lens kit.
If one were wanting to build a kit based on fixed focal length lenses I would think the 20mm would be an easy first choice for the standard, general purpose lens.  For a wide angle complement I would look at the Olympus 12mm f2. The only problem for this lens is it's price, which is much higher than the Lumix 14mm f2.5 and not much less than the Panasonic 12-35mm f2.8 or Olympus 12-40mm f2.8 zooms.